
While all this is going on, the Technical Manager 1 – in charge of lighting – is down on the studio floor and is working with the electricians to adjust the positions of the lamps. Note that around 1965 the studio Lighting Engineer became known as a studio Technical Manager 1 (TM1) (in many ways a less descriptive title): so in the rest of this write-up, the Lighting Engineer is identified as the TM1.
There are some specific requirements for the lighting. Following the BBC guidelines, the Image Orthicon cameras require a base or filler light level of 110 to 130 foot-candles when using the incandescent lamps in the studio in order to produce good quality pictures The general rule is to use three-point lighting for each performer – a general base or Filler light, a Key light to create the highlights and shadows needed to provide depth to the performer’s face (and which should be about 1 to 2 times the Filler light level) and Back lighting, directed from the lowest possible angle, to pick up the outline of the performer and separate the actor from the background. This Backlight should have an intensity of 1 to 1 and a half times the Filler light level. Top lighting should be avoided. The camera headlights, where used to provide sparkle in the artist’s eyes, is approximately half to 1 times the Filler light level. This ‘three-point’ lighting scheme is designed to allow the actors to move about freely and be viewed from many angles: any one of the three lights may be either a Back light or a Key light depending on the camera being used at the time. The angles of the lamps must be adjusted so that, as far as possible, the unsatisfactory positions for the artist occur in long shots, and the close-ups coincide with optimum portrait-lighting conditions.
The TM1’s task is to meet all the technical requirements of the cameras in regards the lighting needed for any scene, then to add some artistic interpretation. High contrast ratios and wide variations in lighting conditions generally have to be avoided.
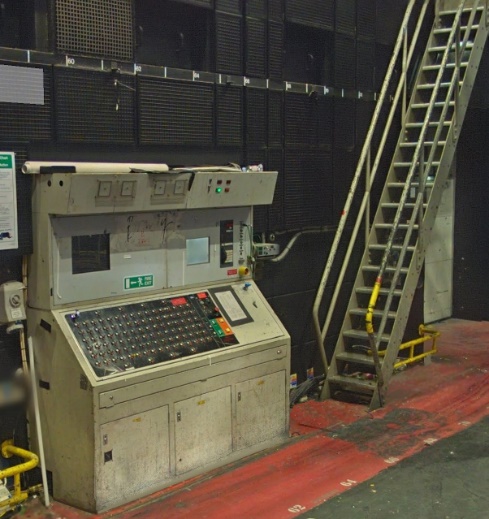
Lighting Hoist Control Panel
The lighting has already been planned by the TM1 and drawn up on the studio plans, and the electricians would have rigged the lights overnight: the lights are mounted on motorised barrels which can easily be raised or lowered. The purpose of the TM1 during this morning is to tweak the position of the lamps, that is, to make some small, fine adjustments when he sees the set and lights in position on the day.

Meanwhile, up in the Lighting gallery (the Lighting and Vision Control Room) – one of the three galleries which were on the first floor and overlooked the whole studio -the Vision Control Operator (Vision Operator) has a job to do: this is to connect each camera to its Camera Control Unit. Behind the position where the Vision Control Operator usually sits is the “Catherine Wheel”. From the central circle of the Catherine Wheel, a labelled cable for each camera drapes over the bottom. Around the outer ring of the Catherine Wheel are the outputs from each of the camera inputs on the studio wall. With reference to the plan – and often with conversation with the crew on the studio floor – the Vision Control Operator connects the correct wall point to the correct Camera Control Unit – and that is basically his work done for the day. (Ideally, the Vision Control Operator now has to check that all the irises on the camera lenses are set correctly, and has to set up the monitor brightness and contrast of all the monitors in the Lighting and Production galleries.)
The camera cables from the Catherine Wheel feed through to the Apparatus Room, where the Studio Engineers – known as “Racks” as they sat by the racks of equipment – look after the camera control units and other electronic equipment.

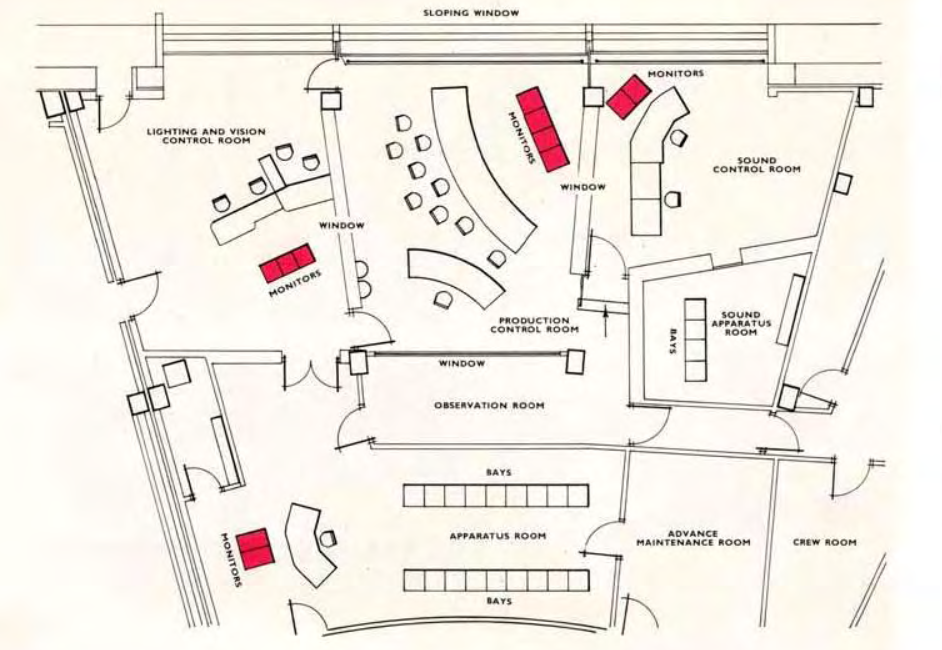
In the central, Production, gallery (the Production Control Room in the plan above), the Technical Manager 2 (previously known as the Technical Operations Manager) begins the various checks to make sure that the incoming lines (sound and vision) from Telecine are set up, and the lines to Presentation and Network Control are in place, and that the sound and vision lines for eventual film recording and videotape recording (when used on “Softly, Softly”) are also satisfactorily set up.
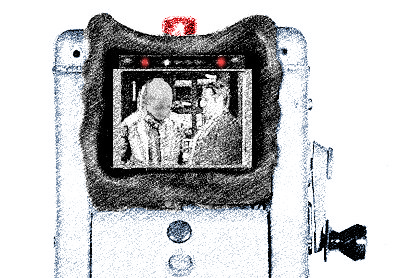
For this episode, the director wants to show what someone could see if they were peering through a peephole in a fence, and to do this, he has requested an Inlay operation. Usually the Inlay was requested for a wipe between shots, rather than a straight cut or cross-fade, but this is a special use. The Inlay Operator sits in a corner of the gallery, furthest away from the window or the door, and is busy setting up the Inlay machine. This needed setting up, for nearly every technical operator plays with this Inlay machine when they are in the gallery waiting for something to happen, so it could well be out of adjustment or alignment. What is more, usually the inlay operator has had to go to Technical Stores to check out the mechanical slides which are to be used to do the wipes. If a wipe was required, the Inlay Vidicon camera looked down at the slide – which when set up masked a light source – and as the slider was moved to the right or left, the waveform generated from the Vidicon was used to switch the line waveform between the original source and the other selected camera.
For today’s episode, a different technique is to be used. The fence is a picture – a 12-inch by 9-inch caption card – with the knot-hole blacked out. This image is fed into Inlay. When the Inlay machine detects an edge between the lighter areas of the fence picture and the black level of the knot hole, it switches the line feed to transmission from the camera seeing the “fence” to the camera seeing what is supposed to be seen through the knot-hole, At the edge where light changes from black level to the “fence” picture once again, the inlay machine switches back to the original camera.
On the other side of the Production gallery to the Lighting and Vision Control gallery is the Sound gallery (Sound Control Room). This is as usual a hive of activity. The Sound Supervisor is sitting at the sound mixing desk. His first job is to make sure that all the microphones plugged into the wall sockets are correctly patched to the appropriate faders on the mixing desk. For a series such as “Softly, Softly”, this was not too arduous, as it was mostly boom microphones which were used throughout the show.
There may be a need to set up some special effects. Television Centre mixing desks at this time had a facility whereby, if a person in shot was receiving a phone call, the speaker’s voice would be distorted as per the phone system, the speech distortion would switch between microphones as the vision mixer cut from one shot to the other end of the call.
The Sound Supervisor also has to check the Ferrograph which was kept in a drawer in the desk. This runs a tape loop with “Studio Atmosphere” recorded on it. Often there is a pause for absolute quiet in the studio once the aircon has settled down and any constantly-powered practical devices are up and running to allow the Gram Op to record this background noise as “studio atmosphere” (atmos) for that day’s particular production setup. The Ferrograph tape loop was automatically cut in if and when the Floor Manager pressed the Prompt Cut – which cut all sound from the studio floor, so the prompt could be shouted to the actor or actress (in the two series of “Softly, Softly” which included live episodes, this only happened (in the author’s experience) to one actor once).
If there are a lot of sound effects or music to be played during the episode, a specialist “Gram Op” (Gramophone Operator) is used. On some programmes, the only music was over the closing titles – the roller caption -and gram-op duties were done by one of the sound crew. For shows such as “Z-Cars” and “Softly, Softly” there always is a Gram Op on each of the episodes. The Gram Op also operates the phone ringer for the practical phones used in the sets (that is, working phones, not just props (properties)).
For this episode of “Softly, Softly” there is a need for a lot of background sounds. – the pub is playing music and there is background chatter, the pub fronts onto a road so there are traffic noises. The street scene needs children playing, dogs barking, vehicles moving: there are many live sounds to play in to create the right sound scape for the each of the scenes. So on the Duty Schedule for this episode (as for all “Softly, Softly” episodes), a specialist Gram Op has been assigned.
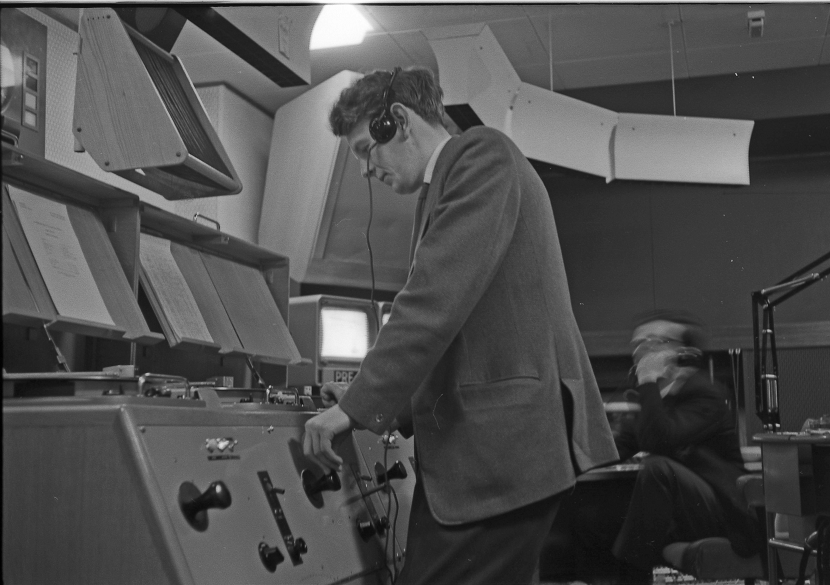
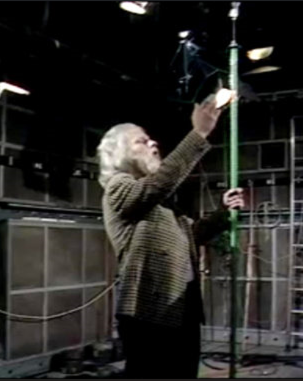
Gram Op setting up
By now the Gram Op is in place by the tape and gram desks, busy sorting out the various play-ins. His task is to make sure all the tape inserts are on the appropriate spools, and that any effects disks are set up correctly on the gram decks.
A drama script would be delivered to the Sound Office up to three weeks before the Gram Op’s two days in the studio. The director may have already noted in some important sound effects
The Gram Op will also have attended one of the rehearsals (the Tech Run) for this episode in one of the local church or TA halls, and he has checked out the length of the scenes that need background atmosphere and special effects., and has booked out required sound effects from the gramophone library.
If the sound effects have turned out to be quite complex, the Gram Op would try to find an empty Sound Control Gallery and prepare reels for each of the three tape machines in studio TC3’s sound gallery. Commonly sound effects are recorded on 33 rpm vinyl discs and it may be necessary for the Gram Op to lengthen any one individual effect to accommodate the longer scenes. If any 78 rpm vinyl effects disks kept in TC3 are scratched or badly worn (which is usually the case), the Gram Op will need to get a replacement from the Gramophone (Gram) library at Television Centre – and may have to edit out any clicks and scratches from even those possibly worn discs (although the effect would probably be usable if the background (effect) sound was set to a low level). All these pre-prepared tapes are loaded onto the tape machines.
Back on the studio floor, some more items need to be connected up. If a portable cue light is needed, this has to be placed in position and its cable tied off and connected to the correct wall socket output. Most of the cues on “Softly, Softly” are given by the Floor Manager (FM) or Assistant Floor Manager (AFM), so there is little call for this. The director always says “Cue” over talkback before saying “CUT” (cut to the camera having the first shot on the scene), because, although the camera cue lights could be used for cues, there is always a slight pause while the actor reacts to seeing the camera cue light (which incidentally also has a very slight delay compared to the vision mixing desk).
Some of the props (“properties”) used in the programme and placed in position on the set are just there for effect, but some are practical. “Practical” means that the prop is supposed to work properly. So, a practical telephone has to be connected to a wall socket using the telephone’s cable (so that the actor would hear sound coming out of the earpiece): this is connected and tied off by a Technical Operator. If a lamp is practical – that is, the light is on and shining – that is rigged by the Sparks (the electricians). If the lamp has to be switched on and off by the actors, the lamp power supply is patched into the lighting console up in the Lighting Gallery. When the lamp is to be switched on, the actors never, ever prod the switch with their fingers. Instead, they more or less cover the whole switch with their hand, and flick the switch that way. The switch was NOT practical – it did not work; when the actor puts their hand over the switch, the TM1 or Vision Supervisor in the Gallery fades up the light in question. The “hand over the switch” means that the two actions need not be exactly synchronised: the TM1 has a beat in which to do the action. (Watch any live or “as-live” drama production to see the “hand over switch” technique in action!)
If there is a kitchen set as part of the story, there may well be practical water taps and practical gas stoves – these are always a pain, as the feed pipes for these cross the studio floor and it means a restriction for the camera pedestals and microphone booms. Sometimes the feed pipes are slung by rope from the gantry to clear the fire lane, then routed by available scene hoists to the set. Not always…
On many of the “Softly, Softly “episodes, there is a pub set, and sometimes there is a practical beer engine. Worth checking that out, as it usually means a free beer after we come off air at derig.
The studio is now fully rigged. It has taken less than half-an-hour, although an hour has been allowed for the rig in the schedule. Although the Image Orthicon cameras have been the first things to get plugged in and connected up, they have to warm up before they can be used: as there is nothing anyone can do for at least half an hour or so (and then in any case it would be the studio engineers checking the cameras) it is time for Lunch Break: half past twelve (12:30). (Rigging could take longer than half an hour, but that meant you couldn’t get off to lunch early!)
(By the way, not every studio needed to be rigged in this way, although this is typical for the Television Centre Studios in the 1960s. The Television Theatre was more or less permanently rigged, with Camera 1 on a Mole Richardson-Crane in the centre of the stage, camera 2 and camera 3 on the stage, left and right of camera 1, and camera 4 on a pedestal or Vinten Motorised crane in the Stalls. Studio E Lime Grove, after refurbishment with EMI 203s in 1964, was used for programmes like “Nationwide” and “24 Hours” and was more or less permanently rigged.)
Lunch Break usually means going to the BBC canteen at Television Centre, although there are a number of eateries down at Shepherd’s Bush. These establishments tended to be favoured if the crews are working in the TV Theatre (you had to leave the Theatre to get to Lime Grove canteen anyway, and there were many temptations en route). If you were working in Lime Grove, you could either walk up to Shepherd’s Bush or negotiate the windy fire escape! (the fire escape was the recognised route to the canteen…)
The Television Centre restaurant block actually contains four restaurants – staff self-service, waitress service and a snack bar (the Ground Floor provides the night service, usually cooked to order for the overnight set and light crews). Usually walk round the ring road to the Restaurant block, then up to the self-service restaurant. The floor above was for the waitress service – and was, of course, more expensive. It’s where the “nobs” went to eat. The self-service restaurant offers a good variety of food at lunch time (some say that the third floor was better than first floor usually, but at that time wasn’t always open).
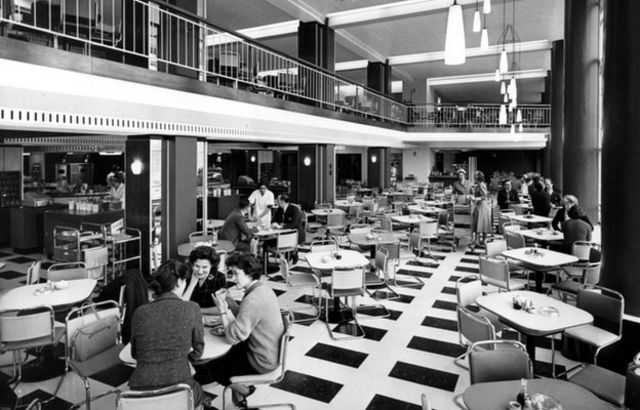
k
Some people go to the BBC Club, which serves food as well as drink, and at this time it has a really good salad bar: you could cantilever the large lettuce leaves out beyond the rim of the plate and so load up with plenty more salad offerings – and pay the same price.
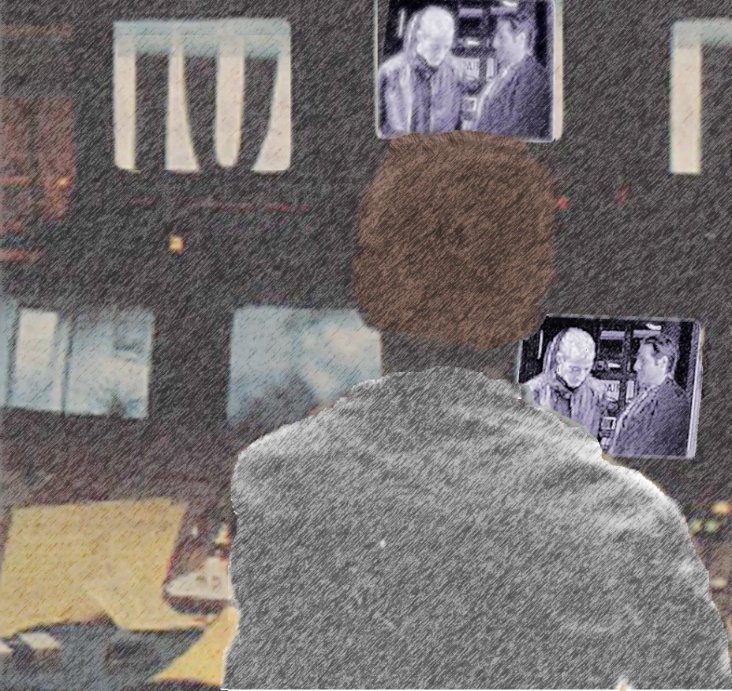
After lunch, come back to the studio and sit in the production gallery – watching television! (Often it was the Children’s programmes – but sometimes special programmes were shown internally – “broadcast” closed circuit television. The programme “The War Game” was shown internally following its withdrawal before the provisional screening date of 6 October 1965.)
Approaching 2 o’clock (14:00) and now it is time to go to the crew room and grab my “cans.”
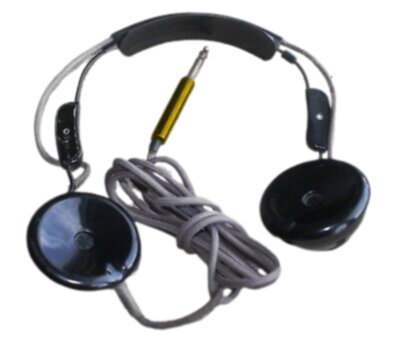
These lightweight plastic STC earphones – initially made for telephone operators – were issued were issued to each Technical Operator when they first were sent to the Studios to join a crew, and they were for the Technical Operator’s personal use – you did not swap around earphones! Some people personalised theirs with curly cables or found some rubber ear attachments made them a little more comfortable to wear. One thing in their favour – they were easy to slip on and off (and sometimes a little too easy to slip off).
Back through the Production and Vision Control gallery and then down the gantry stairs to the studio floor. Cameramen, trackers and boom operators plug their earphones into the appropriate jack socket on their equipment.
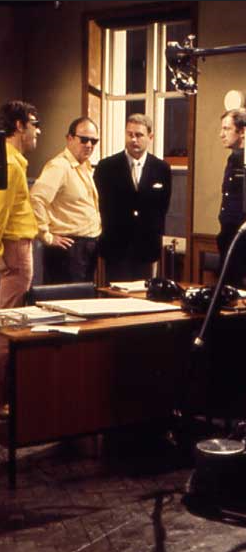
By this time, the production team and the studio management team have arrived in the studio – the Production Assistant, Director and the Vision Mixer upstairs in the gallery, studio management on the studio floor. As noted, up until about mid-1963, Vision Mixers were part of Technical Operations, but then had been transferred to studio management, although they operated a complex piece of technical equipment – the vision mixing desk! With the studio management team come the full scripts for the episode: these are duplicated onto yellow foolscap paper: yellow so that if by chance a page of script gets into shot, it will not cause a problem (like a “flare”) with the Image Orthicon television cameras (and yellow also to distinguish these full camera scripts from the rehearsal scripts (duplicated on white paper) which don’t have camera shots marked up).
The 4.5-inch Image Orthicon tubes in the camera are essentially cathode ray tubes. The front part of the tube contains an electron multiplier, which operates as a high-efficiency amplifier (an image intensifier). Images falling on the front plate emit electrons which land on the glass target. This is so thin that the electron charge could be read from the back side of the glass. High velocity light-induced electrons deplete the charge on the glass by knocking out electrons. The scanning beam puts them back on each scan. The scanning beam then returns to the back of the tube, where it enters a five-stage electron multiplier. The missing charge in this return beam is the video signal. As the Image Orthicon tube is a variant of the Cathode Ray Tube, a picture could get imprinted or “stuck” on the tube. To prevent the image from “sticking”, the scan coils include an “orbit” mechanism which moves the scanned area around the front surface of the tube. This Orbit is controlled at the camera. If a cameraman forgot to switch ON Orbit in rehearsal, he could sometimes get an image stuck on the tube. To get rid of the stick, the camera had to be pointed at a bright, evenly lit object, such as a soft or defocussed light. This “burn off” did help the immediate problem – but may have affected subsequent picture quality.
Another feature of the Image Orthicon tube is that a very dark (black) halo could be produced around the edges of a bright light, for example, a lamp caught in shot, or indeed a page of white paper. This apparently is due to electron scatter because of the very bright part of the image.
The Marconi Mk IV Image Orthicon cameras have lens turrets. The turrets contain four lenses to allow the camera to achieve a Wide Shot (WS), Medium close up (MCU), Close up (CU) and a big close up (BCU) without too much camera movement. Sometimes with mis-co-ordination between the Vision Mixer and the Cameraman, you sometimes saw lens changes on shot – of course, this did not happen if the camera had a zoom lens fitted, but that came with its own set of problems.

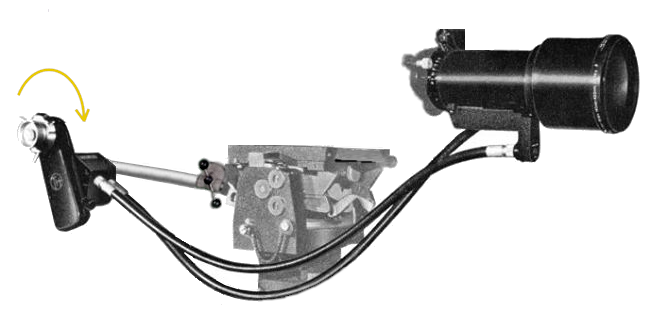
Marconi Mk IV Camera Lens Change
Camera focus is achieved by moving the tube assembly within the camera body: the lens turret did not move (and the individual lenses did not focus). The focus handle is at the bottom right-hand rear of the camera body, together with the tube friction brake, with the lens change handle above it near to the top right-hand rear. The Marconi Mk IVs had a very smooth lens change mechanism.
The Marconi brochure states: “…The lens change handle actuates a folded geneva mechanism that provides the required simple harmonic acceleration characteristic and, in addition, gives very accurate registration. The mechanism is fully self-adjusting to compensate automatically for any wear…”
The microphone Boom operators each grab a copy of the script. They are interested in capturing the dialog, as the boom operator has to make sure that the face of the mic was picking up the wanted sound, the rear of the mike masking the sounds of the camera movement, scene changes, actors’ movements and so on. The sound assistants assigned to be boom operators climb onto the deck of the Fisher mic booms check all the cabling across the various pulleys, and fasten their script to the script holder.
The scripts are duplicated using wax stencils (Gestetner or Roneo machines and inks) at a specialist print unit.
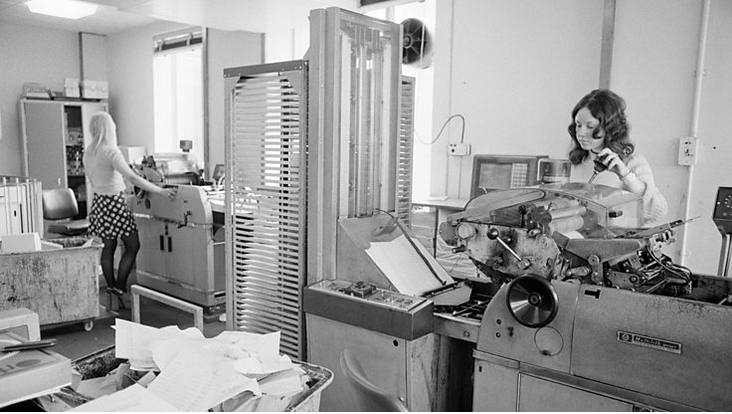
Quite often, the scripts have to be amended during the episode planning process: sometimes for dialog, sometimes for stage (and camera) directions. The amended page is not usually re-cut from scratch: the existing page of script is cleaned of ink, a fresh backing page is added to the stencil header and the whole thing is fed back into the typewriter. The typewriters have to be kept clean, as the wax build-up on the keys would mean that the letters would not cut through the wax on the stencil – and the typewriters have to be cleaned of any ink that is put on the rollers when a stencil is corrected after being used to duplicate the page the first time.
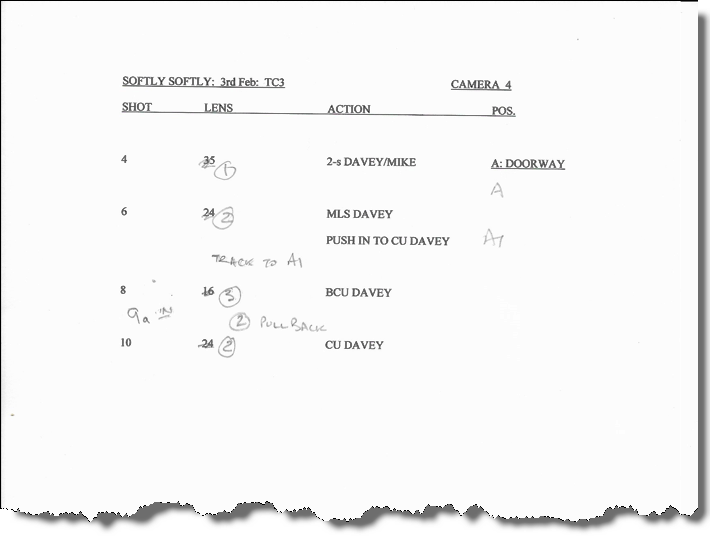
A full script isn’t needed for the cameras, as a cameraman (at this time, it is always a cameraman) does not have time to refer to the script and look at the picture composition in the viewfinder at the same time. In any case, the scripts are nearly ¾ inch thick (nearly 2 cm thick) and it would seriously impede the balance of the camera if the script is placed in the shot card holder. Instead, the cameramen have a set of “shot cards” for each of the cameras. The shot card lists the shots for each camera by shot number and shot type, together with the start position and rudimentary “stage directions”.
These are typed out by the production secretaries. The Pedestal cameras only need one copy, but the Heron crane needs two – one for the cameraman, and one for the tracker (or Dolly Operator) who is driving the crane. (Other cranes needed a larger crew and correspondingly more Shot cards prepared.)
 | 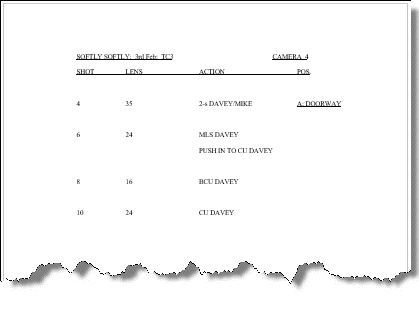 |
Artist’s Impression: Script and matching shot card for
camera 4 (part only of the shot card, relating to the
page of script
At this time at the BBC, the four fixed lenses on the Marconi camera turrets have angles of view of 35 degrees (wide angle), 24 degrees,16 degrees and 9 degrees (close up): in terms of focal length these were 2-inch, 3-inch, 5-inch and 8-inch, mounted in sequence clockwise (from the cameraman’s viewpoint).
So, on the Marconi Mk IV cameras as used in the Television Centre, the sequence of lenses on the turret was – as a sort of rule-of-thumb – Wide Shot (WS), Medium Shot (MS), Medium Close Up (MCU) and Close Up (CU), as the turret rotated – that is, it was linear. If a very wide-angle lens (a 50º or 60º lens – available from Stores) was to be used, this usually replaced the 2 inch (35-degree lens) on the turret, in which case the longer focus lens (usually the 8 inch) had to be mounted in the turret opposite to this wide-angle lens, so that the lens hood would less likely to be seen in shot. The cameraman had to remember which way to rotate the turret if there were some quick lens changes.
(In some studios – not the BBC Television Centre Studios – where there was not a lot of headroom and the lights were mounted much lower, or where the studios used a different sort of light sources, the lenses on the Marconi Mk IV would usually require longer lens hoods to prevent flares. In this case, the eight inch and the five-inch lenses were usually swapped in position to prevent the lens hoods getting in shot.)
(actually, for “Z-Cars”
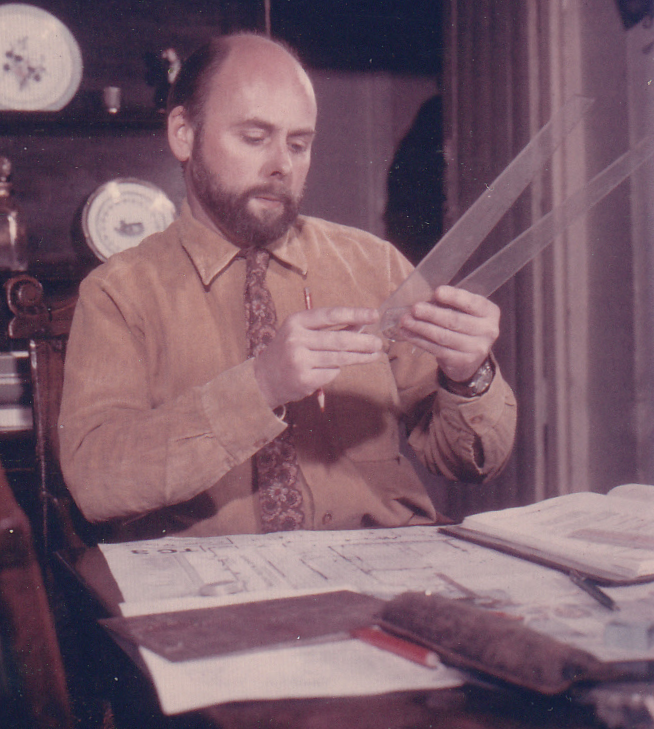
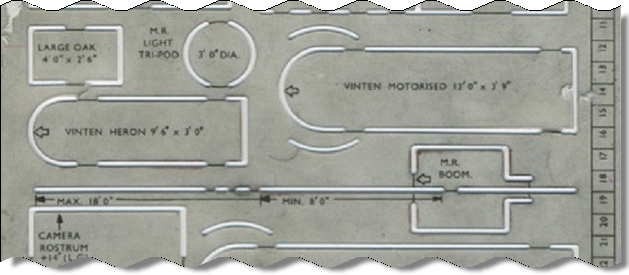
When this episode of “Softly, Softly” was being planned, the director (or assistant(s)would have plotted the camera positions and the camera view using stencils, as there were stencils available for cameras and booms and so on, and there would have been protractors for the various lens ‘angles’ in degrees to set the field of view at this production script (equivalent to the film industry shooting script) planning stage.

So as the scene is worked through, some cameramen mark up the shot card to show which lens position to use – and in the Marconi Mk IV cameras a tell-tale for the lens position in use was illuminated at the top of the viewfinder, so this was a no-brainer!
The 35-degree angle of view lens – the 2-inch focal length lens – would be marked up as lens 1, for example. The cameraman had to remember which way to turn the lens-change handle to get from a BCU (Big Close Up) to a looser shot – if he went the wrong way, there were another two turns of the lens-change handle, which in a fast-moving drama could be a problem.
The senior cameraman assigns roles to the camera section of the crew. At least one of the Dolly Operators (today it is Dolly Op 2) is assigned to drive the Heron. Normally on a prestige drama such as “Softly, Softly” the Senior Cameraman went on Camera 1, the next two cameramen on the crew list took Cameras 2 and 3, and the “Assistant Cameraman” took Camera 4. This week, one of the two cameramen (the one who normally would do camera 3) is angling to get an early tonight, so there is an element of crewing down. The crew “Assistant Cameraman” takes Camera 3, the two pool cameramen assigned by the TODS go on cameras 4 and 5, and the Dolly Op 1 on the crew takes Camera 6. This way of doing things (“crewing down”) helps everyone to get trained up and experienced at all the various jobs.
A BBC definition of the cameraman’s job from about 1960
“OK Studio, ready”.
Call to arms from the Floor Manager). The first studio rehearsal – the “Stagger Through” – is about to start.
Note that there have been some terminology changes over the years …:
| 1960s | Later |
Stagger Through |
Blocking |
The studio clocks inside the studio show “REHEARSAL” in Blue.
The entry doors to the studio from the Red Assembly Area (and all other doors leading to the Studio) also show “REHEARSAL” in Blue.
The artists – the actors and performers – have their dressing rooms round the inner ring of the Television Centre, so it is a very short walk to the Red Assembly area and then through the studio doors.
So we start the “Stagger Through” – so called because the script is gone through slowly (at a stagger!) so that all shots can be established. It takes about eight to twelve minutes of “stagger through” time to get through one minute of script (later, the term “Blocking” was used for this part of the rehearsal procedure). Of course, some scenes took less time to “stagger through”, others more. At the beginning of each scene, each camera moves to the position indicated on the shot card and as shown on the studio plan. Around the studio wall at gallery height, a black and white ruler is marked out with the identification of the grid value, so it is easy to get to the planned position.
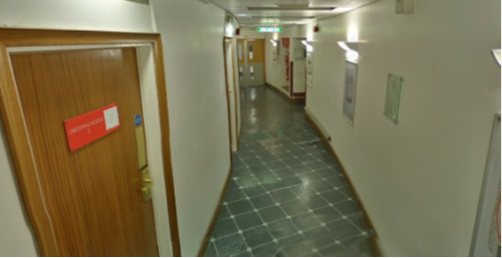
The telecine film insert for the “Softly, Softly” title sequence is taken as read, although the telecine operator may run though the titles to check. There are two title captions that are used as part of the title sequence, but with no telecine, they are not used yet. So the stagger starts on shot 3 on camera 1. A close up of part of the pub, then a track out to an establishing wide shot of the pub doorway. Cue the actors who walk into the doorway and sort of collide into each other – apparently by accident. One of them starts a conversation, the other not interested.
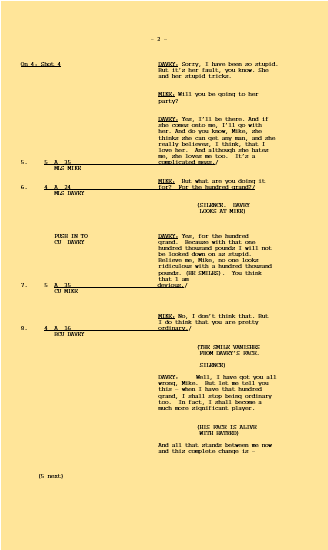
Shot 4 on camera 4 is a shot of the doorway with one of the two characters trying to leave the pub but being held in conversation with the other character.
Camera 4 goes to the position identified on the shot card and shown in colour on the studio floor plan, and frames up shot 4 – marked up on the Shot Card as a “2-s DAVRILL/MIKEY”. This means that both characters should be in shot together. The Cameraman has framed up a 2-shot of the two characters in the viewfinder as best as he can. To get a well-framed frontal 2-shot, there is very little of the set showing – just a very small bit of the door frame.
Here is a peek at the camera viewfinder through the viewfinder hood: some Marconi Mk IVs had full viewfinder hoods with rubber eye shields (surrounds.).
Artist’s Impression of the picture in the Viewfinder
The other Image Orthicon cameras, and other Marconi Mk IVs, had simple hoods consisting of a top sheet and side cheeks, with rubber round the sedges. This hood was better on a fast-moving programme as the viewfinder screen could be seen from a wide angle.
Television is a “close-up” medium (particularly at this time) – unlike in the large screen cinema, small items in the picture are completely lost. In the 405-line system, the equivalent pixel values for comparison with modern (2022) digital photography for horizontal and vertical parts of the picture are 503 by 377 pixels, which gives a static picture resolution of somewhere around half a megabyte (0.5689 Mb). The finest detail that can be seen corresponds to a frequency of 3 Megacycles per second along the line waveform (megahertz (MHz)): the television lenses are manufactured to resolve detail at 3 MHz, and their response falls off quickly after that.
The equivalent for 625-line analogue TV is about equal to704 × 576 pixels (standard definition), which at approximately 1.22 Mb (equivalent) is well over double the resolution of the 405-line standard (and the finest detail resolves to about 7 Megacycles per second (7 MHz) – if the lenses can resolve this level of detail!).
But still, terrestrial television at this time (mid nineteen sixties) with analogue transmission of sound and vision means that close-up pictures work much better than wide shots.
This shot is a very loose medium 2-shot of the characters, and most of the set is not visible The establishing wide shot (shot 1 on Camera 1, using the height of the crane to get a high angle wide shot of the pub exterior – this shot is not shown on the script segment) has pictured for the audience where the characters are in relation to the set. Camera 4’s shot however is not all that clear – the actors could almost be anywhere! The situation is made worse, because most of the monitors in the studio gallery – and certainly the television sets at home – don’t show the edges of the picture, so the door framing included in camera 4’s shot is to all intents and purposes, lost.
The director asks Camera 4 to move to his right, to get a bit of an angle on the two characters. He also asks the floor manager to ask the actors to change their positions slightly: the one to the left of the picture, looking down to the ground, could move forward a pace. These two changes give a better shot. It is a “cheat” – the actor who has moved is no longer physically in the doorway of the pub, but provided both actor and camera get the right position, there is an attractive shot which makes it appear that the two characters are in the doorway.
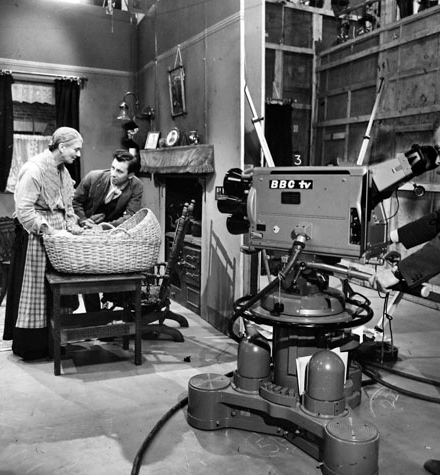
The actors in the scene will have to remember this position when it comes to the run-through rehearsals and performance. In the past few days, they have been rehearsing in a church hall, with most of the sets marked out with lines on the floor, so this is the first time they have actually rehearsed with the correct sets and props. Some sets are the same for each episode of the series, sets such as the police station entrance, the interview room, the local bar, and the regular actors know where the sets and props will be and how they are to interact with them. But at least half the sets for the episode are new sets, and there is a new set of “criminals” each week who have to work out their positions within the sets: today is the first day that they have seen the sets for real (although they will have seen the designer’s card model of the set at outside rehearsals, and the props positions would have been marked out in the rehearsal room).
the front of the desk will be made from a Photo Blow Up – no 3-D fabrication he
Camera 4 cameraman needs to hit this position accurately, as the framing of the shot is now quite tricky, and the adjacent set does not allow much freedom of movement. So he marks the studio floor with an arc, following the curve of the rear of the camera pedestal, with a yellow timber crayon and labels it “A”. He notes this on the Shot Card. (Timber crayons are used, as the marks wash off then the studio floor is cleaned during the overnight set and light for the next production.) Usually yellow timber crayon is used for camera marks, as it is less likely to be visible on the studio floors in the current monochrome television: other colours are available!
Camera 4 isn’t the only one to have to change position. The boom operator for this scene has set the microphone boom so that the microphone is positioned midway between the two actors, as low down as the operator can get the microphone without the mic coming into shot. On a series such as “Softly, Softly” there was no interest by the crew in playing silly games such as those where the cameraman included huge amounts of headroom or the boom operator consistently dropped the boom into shot, just to be awkward. The cameramen acknowledge that the boom needs to catch good clean dialog, and the boom operators know that for certain shots, the camera has to include some more headroom than usual. That doesn’t mean there are no times for joking around: a favourite of the boom operators is to place a ribbon mic just above the camera viewfinder, which drags the scanning electron beam up to the top of the viewfinder.
In this scene, the boom operator has to swing the boom and twist the mic so that the mic is more or less above the camera position with the mic facing the two actors, slightly favouring the one still in the doorway. This positioning is to get good “sound perspective”. The BBC was very interested in getting good “sound perspective” such that the sound matched the shot. A wide shot, more distant sound. A 2-shot favouring one character, the sound should reflect the positioning. The camera and sound boom become another character in the story and the episode unfolds from their point of view(s).
The Boom operator looks across at the camera and notes which lens is at the bottom of the turret – the current lens in use. From experience gained working with this crew, and knowing the field of view of the lens, the boom operator has a good idea of the amount of headroom he has got – that is, the space between the character’s head and the top of the picture frame. He can lower the boom arm so that the microphone is just above the top of frame. As the camera changes lens, a quick glance at the turret helps the boom operator gauge the headroom for the next shot.
With the mechanical zoom on camera 5, the boom operator can see the position of the zoom control, and from that guess the angle of view of the lens.
(With servo-controlled Zoom lenses such as the Angenieux zoom, and then the later cameras with built-in zoom lenses, the boom operator’s job becomes much harder, as he can only tell the headroom by looking at the studio monitors – which show the current shot only – and which might be too late for a boom microphone in shot moment!)
As the scene is worked through, the cameraman marks up the Shot Card with notes as to the lens to use, the pedestal position and any stage directions.
Artist’s Impression: Amended Shot Card
Camera 4 has to make another floor mark, not such a big one this time, but it indicates the end of a track – the cameraman has to push the pedestal and camera, on shot, to increase the size of the picture from a medium long shot of the character DAVRIL to a close up of him. The cameraman has to make sure that the pedestal wheels are lined up correctly for this movement: he may have to use the tiller to spin the pedestal round to that it will be easier to do the track in. Although the pedestals are well engineered, it is still possible for the steering chain driven mechanism to make a noise if you are not careful: hopefully it will not be picked up by the microphones…
There are some changes as the scene is worked through – and this means more notes on the shot card. In this case, an extra couple of shots have been put in. Up in the Gallery, the Production Assistant and the Vision Mixer have to amend their scripts to note the two extra shots.
The studio floors are thick lino. Inlayed into this lino are grid markings and grid letters in line with the grid markings round the studio wall, so it is easy to find a position, but when accuracy in placement is needed, a floor mark with is essential. Because the camera pedestals and camera cranes have to move across the studio floor – they are free moving, not on rails like cinema camera dollies – care has to be taking with the set design. Sometimes there are rugs in the set, but the cameras cannot track over the rugs, so they have to be positioned with care. Carpets, floorboards, parquet are usually painted onto the studio floor with a water-based paint, so after the programmes the floor is washed ready for the next programme’s sets and floor painting. Camera 4, outside the pub, tracks over a painted road and over a painted pavement.
Floor marks can be clearly seen in the next scene involving Camera 3. Although letters of the alphabet are used to identify the initial equipment positions in a scene according to the studio plan, cameramen usually used shot numbers to identify their marks (shot 22 in this instance).
In this picture, the construction of the sets is very clearly seen. The set is made from theatrical “flats“ held up by braces, which are anchored to the floor by stage weights. The set is sturdy enough as long as a camera – or actor – doesn’t bash into one of the flats, for then the walls wobble and the whole lot looks like it is moving (“Crossroads” (started in 1964) is well-known for its wobbly scenery….).
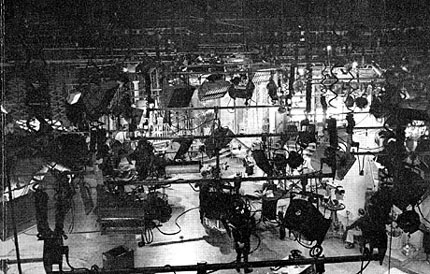
While the cameras and sound people are being directed to get the correct or appropriate shots and sounds on the studio floor, up in the Lighting gallery the TM1 is looking at the lighting and the shadows.
The lighting set up for each set is usually fairly straightforward – for each actor’s position, there is a Key light (main bight light giving contour to the face), Filler lighting from an angle to the Key lights which are needed to fill in some of the harsher shadows, and a Backlight to put a ring of light on the rear of the hair or head and on the shoulders, to pull the actor’s image away from the background. The Background light or lights were there to light up parts of the set. The TM1 has had to work with the programme director and art director (and Make Up, as make up could alter the picture) to help build the mood required for each scene: dramatic lighting, spooky lighting, bright summer’s day lighting. The studio TM1 has to make a studio set look like a real outside location. There is also, however, that technical requirement to provide a base light level of 110 to 130 foot-candles in order to good quality pictures from the Image Orthicon cameras: and do all this, without creating too many boom shadows.
So that the TM1 can check that there was sufficient light, that the Key lights are correctly placed and that the desired lighting “mood” is being achieved, the Vision Control Operator puts all the camera controls in the centre of their range and sits back. The Vision Control Operator has a control for each camera (and the spare) so that is six controls in TC3 (and in TC4). Each control is on a quadrant, forward and back, which opens or closes the iris on the lens – this iris is driven from a motor mounted in the centre of the lens turret on the Marconi Mk IV Image Orthicons. Rotating the control knob adjusts the black level of the picture: pressing on the control switches that camera’s image onto the preview monitor.
If the lights need physical adjustment so that they are aimed in the right place, the TM1 has to go down onto the studio floor and direct the Electricians (“Sparks”) who adjust the lamps using long poles with suitable flexible slotted ends to engage with the mounting clamps for the lights.
Generally, the lighting has to be suitably strong, but has to avoid throwing shadows from equipment, scenery and other actors. One critical thing to avoid are those microphone boom shadows. It was often a trade-off between getting the very best sound or the very best lit picture.
Sometimes quite a lot of adjustment is needed, particularly when actors are asked to change position (as in shot 4) and the stagger-through stops while the physical lighting changes are made.
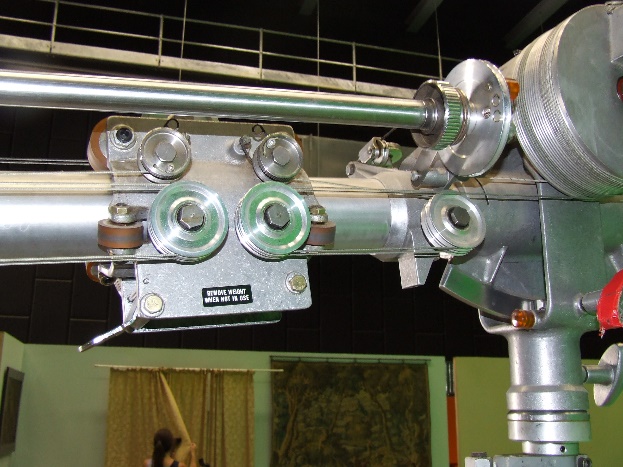
With the scene with the family and baby satisfactorily lit and staggered through, the next scene is in the police station office, Sergeant Watt (played by Frank Windsor) is about to rush out to get to the crime scene. Frank always carried a brief case as Inspector Watt, and when he goes to snatch this up off the counter, it will not move -, and Frank spins round as his arm is wrenched at the shoulder. Someone has put a scene weight in the briefcase, so that when Frank tries to pick it up to make his exit, it is much, much heavier than expected.
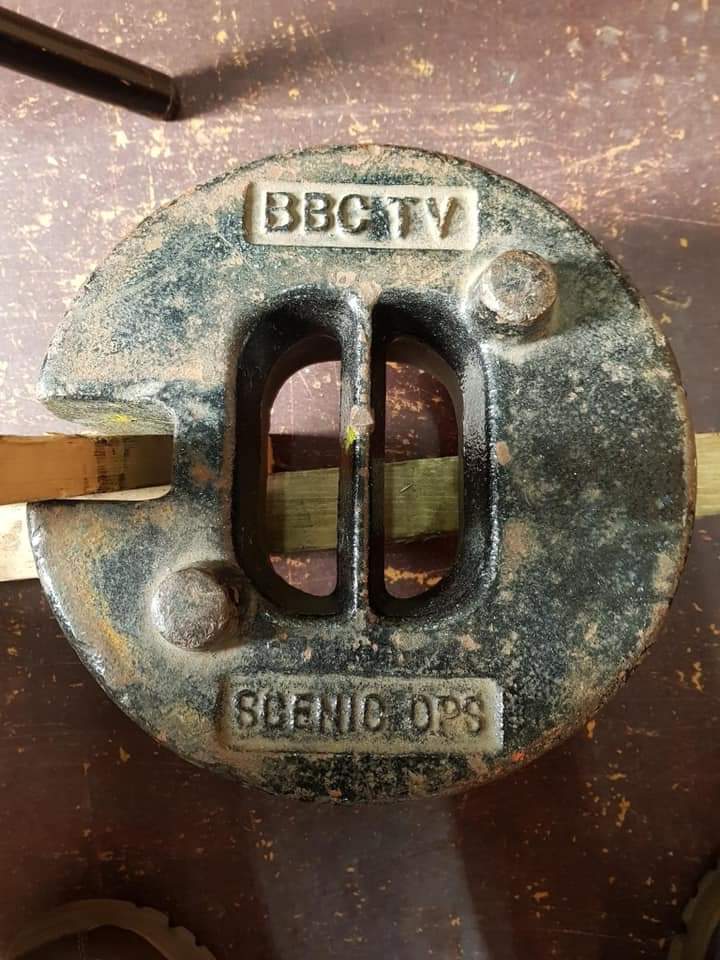
BBC TV Stage Weight
Everyone – cast, crew, production have a laugh, and as it is nearing 4 o’clock in the afternoon (16:00), the director decides to call for the tea break. This is an official 30-minute tea-break, usually shown on the first page of the script, but there is often some flexibility as to when the Tea Break is taken. So head out to the studio Red Assembly area for tea, coffee, biscuits and a natter.
Red Assembly Area is located to the rear of Studio TC2, and serves studios TC1, TC2 and TC3. Depending on when the studios break for tea break, you could meet members of other crews. At this time of the afternoon, the other studios may have broken for tea break at a similar time, so there would be cast members and crew from other productions milling around.
Tea Break over, back to the studio, back to the positions. Sergeant Watt makes his exit successfully, and so we move onto the next scene.
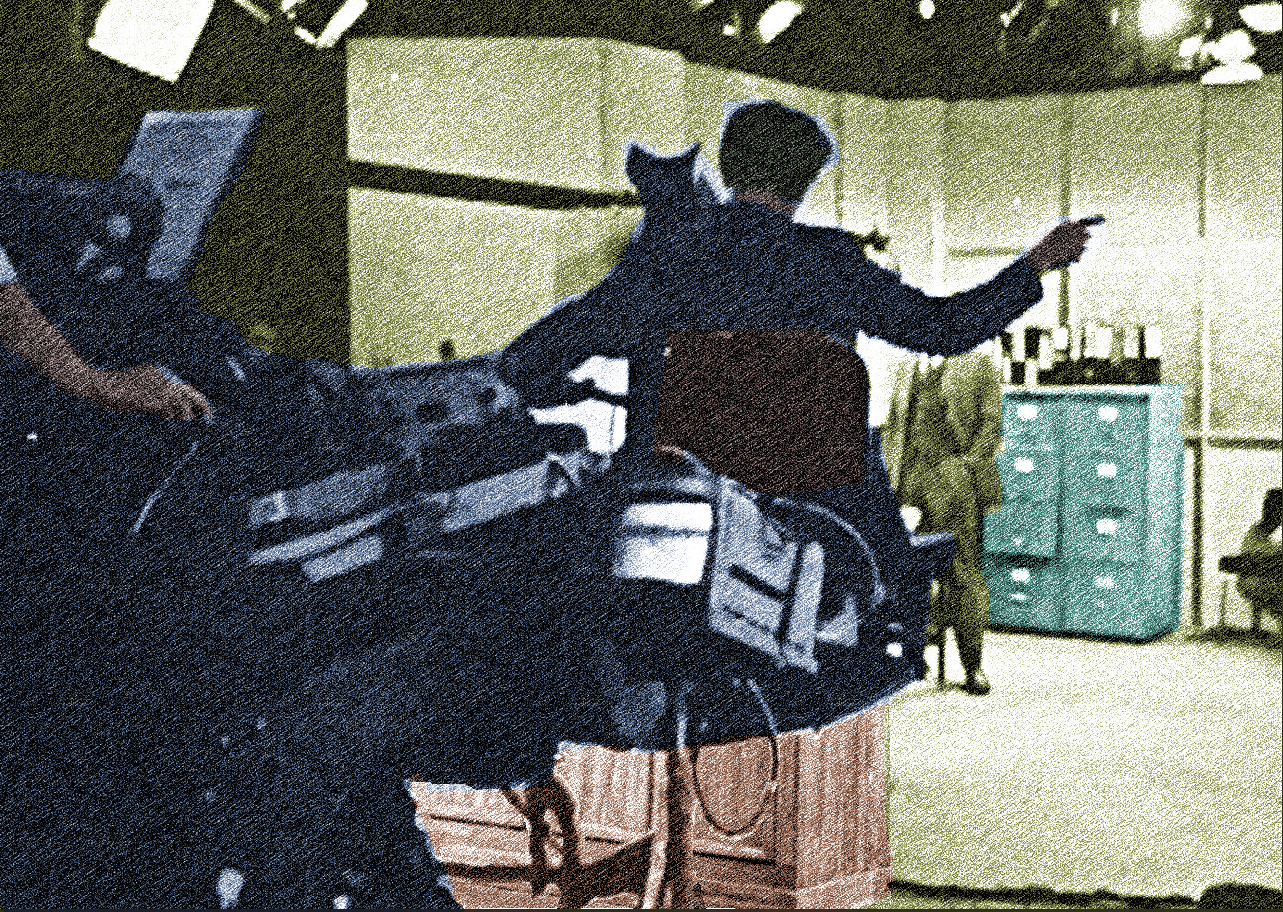
This scene is where the Heron crane comes into its own. The set is built up on a rostrum so to get to this set, the actors have to walk up a few steps, and there is some interaction on the stairway. The Heron tracker – the Technical Operator who is driving the Heron crane – aligns the body of the crane as it is indicated on the floorplan. It is unlikely that this meets with the approval of the cameraman, so there are a lot of hand signals from the front of the crane (there is NO talkback from the cameraman to the crane tracker – it is all done through hand signals!) Right a bit. Forward a bit. Forward a gnat’s (slang for “gnat’s whisker”, in other words, a very small amount). Right a gnat’s. OK. Now the director has a chance to look at Camera 1’s offering. The senior cameraman has worked with the director many times, and can guess the sort of shot he would like.
There are two options as to how to move the front of the crane. The tracker could steer to the right. As the Heron (in steer mode) has rear wheel steering, this means the rear of the crane pivots to the LEFT, the crane pivots around the front wheels so the front of the crane moves to the RIGHT. As the crane is now at a different angle to the set, the senior cameraman has to pan the camera to the LEFT and probably swivel his seat to the RIGHT. Alternatively, the tracker could put the Heron into “crab” mode, and turn the wheels 90 degrees to the right, then ease the crane forward. The whole crane shifts to the right whilst maintaining the same angle to the set. The choice is best made when the next move is known! Usually the tracker would crab the crane – and hope that there are not too many small changes of position.
Marking the floor for a Heron is different to that for a ped. The tracker gets off the crane and marks up a “ladder”. It is likely that shots on Camera 1 are going to be “developing” shots, and if the cameraman wants to make the shot closer or looser “on shot” the only thing to do is to track in or out. So that the dolly operator has some sort of clue as to where the crane should be positioned, he lays down a “ladder” using the timber crayon on the lino floor. The ladder had a long line along the left or right side of the camera crane with marks at right angles to this at approximately one-foot intervals and labelled typically “A”, “B” “C” and so on. If the developing shot is a crabbing movement with the crane moving sideways, the end of the crab is usually marked with another ladder, and the Shot Card marked up by the tracker so that it is clear where the start and end points are. If it is not possible to mark the end point, the tracker just has to memorise the end position, and hope that he can hit the spot – on repeated rehearsals and transmission.
If the Heron has to do complicated shots – a curving track, or sequences of crabbing shots, the “ladder” system of marking is of little use. Other means of marking the position of the Heron are used – for example, the end of a move can be marked with a line along the length of the middle guard and a mark against the rear of the front raiseable guard. A common system of marking (at least within the crew) is necessary – in case another crew member has to take over (a sudden illness on the part of the tracker, for example). The tracker does not have a monitor showing the picture from the camera in front, so it is important to get physically into the right position on each rehearsal, and adjust from there in accordance with the cameraman’s hand signals.
So far so good, but this system breaks down if the cameraman on the front keeps changing his mind about the shot, and moves the crane left and right and right and left until he is satisfied, In this situation, you might end up with ladder on ladder (they are not that easy to rub out if you want to change them, so you end up with multiple “A”s, multiple “B”s and so on). If the tracker works usually with one cameraman, he should be used to the cameraman’s method of operation and only puts down the ladder (or other marks) when he is confident of the position.
The cable guards on the Heron are dropped down as low as possible, so that most cables are brushed aside, including the microphone boom cables. It is most important that the Heron does not run over its own power cable, because the guards cut through the power cable very easily, with spectacular results (3-phase 230 vAC), and an immovable machine. Well, not quite immovable, as there is an hydraulic reservoir on board, which allows for some movement (until the reservoir is empty!). But the power cable has to be stripped from the camera cable, a new one found, re-wrapped round the camera cable and taped up: not nice to do especially if it happens on a live programme. Hopefully, members of the crew who have no other assigned tasks will do “cable bashing”, that is, help to keep the camera cables out of any danger and tidied up as “figures-of-eight”.

The Heron’s hydraulic reservoir is set up to allow silent running. An electric pump pumps hydraulic fluid into this reservoir, and once up to pressure the motor can be turned off. The reservoir then powers the drive wheels and the crane arm elevation, until low pressure is indicated, at which point the pump can be switched on again. Usually on programmes such as “Softly, Softly” the pump is left running all the time, and everyone hopes that the cardioid microphones will not pick up this addition to the studio noise.
The microphone boom operators have to get into position on the set too, so that the microphone can be correctly place. It might mean that the boom base is placed inside another set. The microphone boom arm is counterbalance by a weight on the rearward extension of the boom. As the microphone end is wound out, the counterbalance weight moves towards the rear. The mic cables are wound round pulleys on the counterbalance and the boom rear end, so the cable automatically adjusts in length as the boom extends. If a fault develops in this cable, it has to be removed from the pulleys, and a tested cable restrung round the pulleys and along the length of the boom.
In this picture, the boom operator’s left hand is aiming the mic head for both tilt and rotation: his right hand is winding the microphone in and out.
Although the Fisher booms have a seat – being used in the picture above as the boom is tracked into the set – most boom operating at this time is done with the boom operators standing up, although certain shorter boom ops do sit on the seat to operate, as by doing that they gain some extra inches in height!

Artist’s Impression: Boom Operating
And most boom operators make sure that no clutter is placed on the boom platform, not even the boom tracker’s camera script – that pile will go as soon as the boom operator finishes the scene and stretches out a leg …
It is very tempting to use the boom platform as a useful table on which to place scripts, make up items, occasional props and so on, but the boom platform is a fast moving and vigorous workplace on a live drama programme.
As mentioned earlier, the BBC was very keen on Sound Perspective. The sound on the television set at home should sound like that which a listener would hear if they were standing where the camera is. This means, for example, on two cameras each taking over-the-shoulder 2-shots, the microphone is first positioned over one camera with the mic face pointing at the subject of the camera’s picture, then when the picture cuts to the other camera, the mic should be over that camera with the mic now facing in the other direction, towards the new main subject of the picture. So the boom operator has to swing the boom arm and rotate the microphone cradle on each cut made by the Vision Mixer – and in a fast-cutting programme like “Softly, Softly” that is a lot of physical work.
Meanwhile, in the Lighting Gallery, the Vision Control Operator is busy doing – nothing! This is in the Job Description (and not simply just dossing about). All the controls are put into the middle of their travel at the start of the Stagger, and then left completely alone. The idea is that the TM1 should light the scene such that the images from each camera match – one angle is not hopelessly in shadow, for example. If there is any issue – if one camera’s picture seems darker than the other cameras on the scene, it is the TM1 who has to figure out why, and if necessary, go down to the studio floor to get the Sparks to adjust the position and aim of some of the lamps. Sometimes the barn doors (adjustable flaps top and bottom, left and right) are the source of the problem, and need adjusting.
Back up in the lighting gallery, the Vision Supervisor (working with the TM1) adjusts the lighting levels using the console, and makes sure that the correct lamps are lit when any lighting changes are made.
So we continue with the Stagger Through doing each scene slowly and getting the pictures and sound correct. The actors take their positions and speak their lines.
Staggering Through
It has been said that all that is needed for an actor (actress) to be successful in a continuing drama such as “Corrie” or “Enders” is that “…they know their lines and hit their marks…”. Actors may need floor marks as much as the technical equipment and props: for some critical shots it is very important that the actors hit their marks,
In television drama at this time there were a number of actors (actresses) who would appear in many of the longer running drams series. One such actor was George A Cooper who appeared in many series dramas including “Danger Man”,” Z-Cars”, “Dixon of Dock Green”, “No Hiding Place”, “Angel Pavement”, “Softly, Softly”, “The Avengers”, “The Saint”, “The Troubleshooters”, “Steptoe and Son”, “A Family at War”, “Doomwatch”, “Public Eye”, “Budgie”, “Juliet Bravo”, “When the Boat Comes In”, “Taggart”,” Casualty” and “Heartbeat”. The reason? He was reliable – he knew his lines and hit his marks, consistently.
As did, of course, Alan Stratford Johns, Frank Windsor and the other regular actors in “Softly, Softly”. They liked working on a programme such as this – two run-throughs and a live performance: a more “theatrical” performance.
“Dinner Break!” Time to lock the pan and tilt head on the ped (with the camera panned down so that any lighting work won’t cause a tube burn), crane up the ped – so that it is obvious that it is not locked down – and wander across to the Catering block once again. This time, only the self-service restaurant on the middle floor is open, and it serves quite a restricted menu. Usual fare is some sort of pork pie, chips and beans, with yogurt for pudding. Could use the Luncheon Vouchers – oh yes, you got a Luncheon Voucher worth 3/6 (three shillings and six pence (equals 32.5 pence in new money)) for every time you had to have two meals per turn of duty. Before leaving the restaurant, make sure that you have a handful of wrapped sugar cubes. You can suck on these during the evening to keep up the energy levels.
Back to the production gallery in TC3 and lounge about until it is time to go back to the studio floor – watching Television! But not just watching Television… Is it live or a recording? In those days (mid 1960s) it was quite easy to tell – the bottom half line of the 405-line scan would wander around in length if it was a VT recording (and Film Recording (FR) was always lacking in contrast and definition). Then, what studio was the production done in? When Lime Grove had CPS Emitrons, it was relatively easy to guess: the picture quality from the CPS Emitrons was different to the Image Orthicons (many say the older cameras gave a better facial tone). LG E did mainly current affairs, LG G did “Tonight” and “Grandstand” (although other studios were used …) and then later “Top Of The Pops” – so that only left Studio LG D. The Television Theatre was relatively easy to spot because of the position of the cameras: TC2 and TC5 were again easy to spot as they were small studios. Oh what fun!
Back down to the studio floor, unlock the panning head, set up for the next scene, stagger through, put down floor marks, mark up the shot card as necessary, move on to the next scene…
Many of these episodes of (the original) “Softly, Softly” involve a pub set of some sort. Often this is constructed out of a photo blow-up (PBU) of a pub bar, the bar furniture simply dummies: sometimes, as for this episode, the beer engine is “practical”. This means that there can be shots of the bar staff (likely, the barmaid) pulling real pints (rather than just handing over a pint of dark liquid from behind the counter). As noted, often there is enough left over in the barrel to help with the derig).
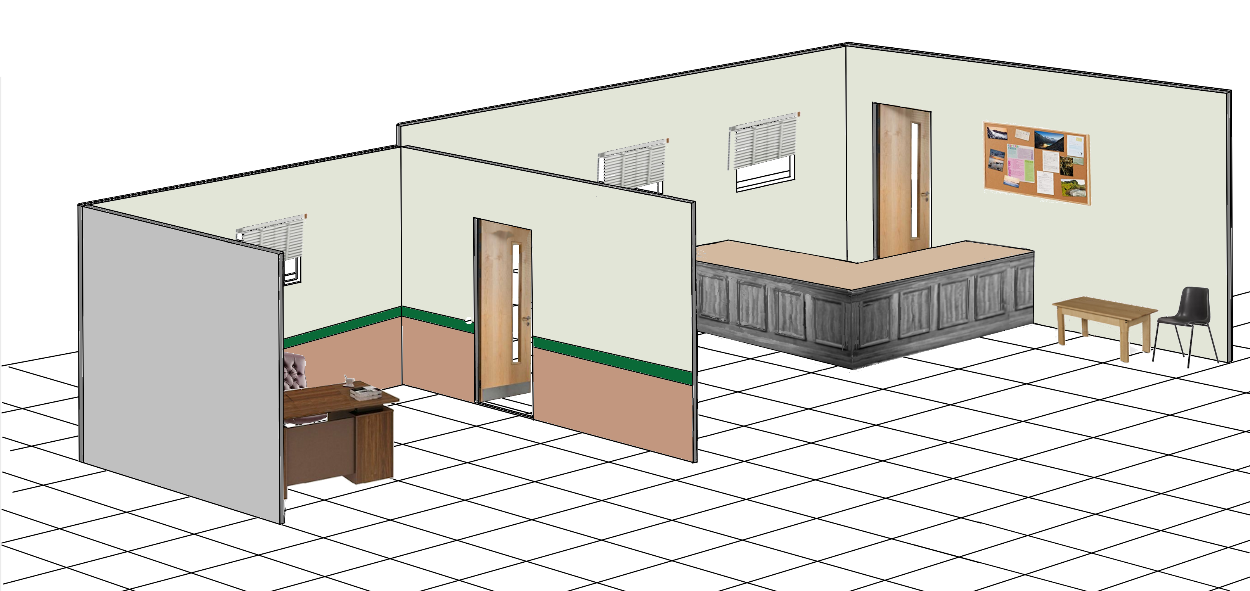
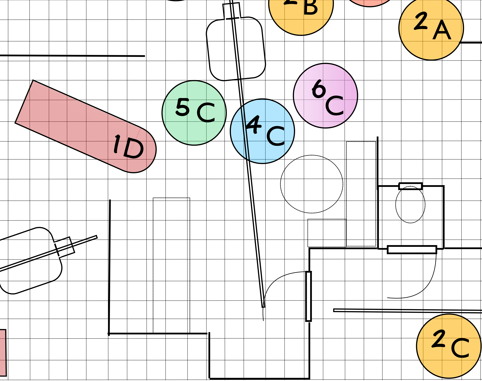
Now, many sets in TV studios were constructed to show two walls (cameras shooting from the supposed position of the other two walls): others were constructed to show three walls (the cameras being the fourth wall).
On this occasion, the WC in the large pub set is unusual in that it has all four walls. The story line is that the wrong-doer will come from the bar, open the door of the WC cubicle and open the small window in the toilet. The “criminal” will then mask part of the window, to disguise the fact that it had been tampered with. So the small window of the WC is now left open, to be featured later in the story. In order to show the confines of the WC cubicle, it had all four walls, and the door was shut.
There is some difficulty in setting up the shots for the bar scene Camera 1 doesn’t have enough room to track into the set to get some close-ups. The Director asks camera 4 if he could move to his left. Camera 4 pans the camera from side to side to say “No” (“shook his head” – no reverse talk-back)). .Camera 6 is on his left-hand side, and there is a table and a bench in the way, even if camera 6 cleared,
Camera 1 cameraman waves his hand at the boom operator, who brings the boom mic close to camera 1. “There’s a bench table that is getting in the way!” camera 1 cameraman says, speaking directly to the director. ”We can’t get the crane round in the space in the set.”
After some discussion with the floor manager over talkback, it is decided that the bench could be shortened in length so that camera 1 could get into position, “Work round it for now, we’ll sort it out by the run tomorrow.” (Provided that the carpenters and scene boys co-operate.)
Because of this, the Stagger Through on this first day of studio rehearsal is dragging on, and there is a bit of tension in the air as the Stagger Through really has to be completed before the two full speed runs are attempted the next day.
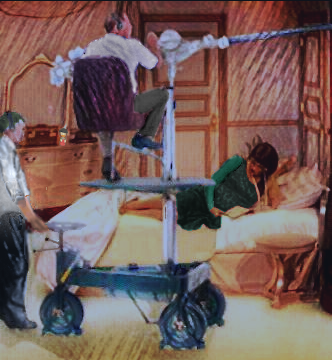
By this time it is around about half-past nine at night (21:30 – ish). The criminal walks to the WC, opens the door – and there is Sergeant Watt (Frank Windsor) sitting on the china with Constable Box (Dan Meaden) sitting on his knees.
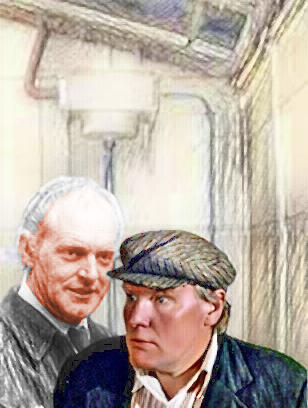
Artist’s Impression: Sargent Watt and Constable Box’s practical joke
Absolute hilarity in the studio – we have to stop the stagger for a goodly few minutes. It certainly reduced the tension in the studio.
Now Constable Ben Box was not a small person by any means. Sergeant Watt and Constable Box must have been in their position for a good half an hour, since it had been a relatively complicated scene on a large set, and no one had seen them go to the W.C.
Getting on for half past ten at night (22:30). The official finish time for the crew today is 22:15 (usually a ten o’clock in the evening finish with 15 minutes allowed for any “wrap up”) , but everyone wants to complete the scene they are working on (this pub scene), rather than pick up more than three-quarters through this scene the next day. The Technical Manager 2 (TM2) has agreed to on overrun, so everyone on the crew gets 15 minutes of extra duty to add to their timesheet.
Make sure all the equipment is locked off (the pan and tilt heads locked with chains on, and the ped craned down and secured), switched off or otherwise secured for the night. “Goodnight” and off home for some shuteye.
 |  |  |